Install SAP Components
Prerequisites
-
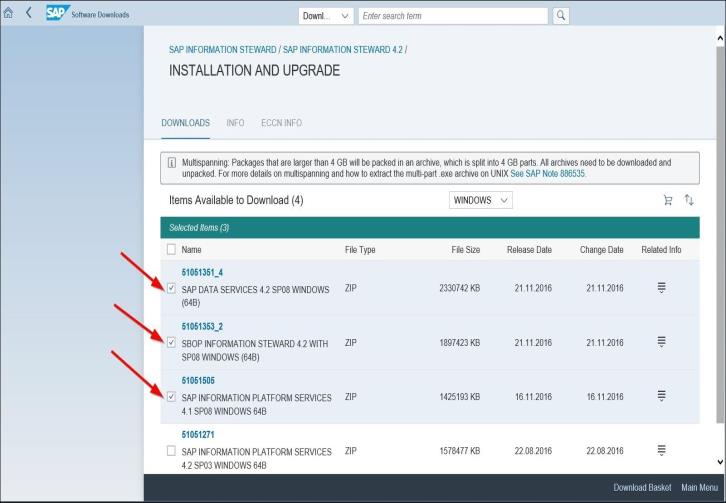
From SAP Support download the installation package. All three packages are found on the SAP Information Steward page. The SAP Download Manager is usually used to download the packages from SAP Support and the link to that package is also available on the following page:
-
Install MS SQL on either the server DS / IS is installed on or on a separate server. MS SQL can be downloaded from the SAP Support Portal.
NOTE: MS SQL is supplied as a multi-part archive download.
-
Enable Adobe Flash Player, required for Information Steward, using the Desktop Experience feature on MS Server 2012 / 2012r2 or 2016.
-
Obtain the three licenses required. One license is required for each of the following:
- IPS
- DS
-
IS
NOTE: Installation cannot proceed without the licenses.
Install SQL (if downloaded from SAP Support)
SQL can be installed on the server where Data Services / Information Steward is installed or a separate database server.
-
Right click the .EXE file and select RUN AS ADMINISTRATOR.
This unpacks the multi-part archive and puts it in the folder specified.
-
Open the folder specified above.
NOTE: Review the readme.txt and a PDF provided.
-
Right click SQL4SAP.bat and select RUN AS ADMINISTRATOR to install SQL
NOTE: This is a silent install.
- After the install, change the authentication mode to allow both “SQL Server and Windows Authentication.”
Install Data Services and Information Steward
Create Databases, Users and Data Sources
-
In the SQL instance, create four databases and users. Make the users db_owners of the associated dbases. See examples below.
NOTE: These must be accounts with non-expiring passwords.
For example:
- Database: IPS_CMS User: CMS_User
- Database: IPS Audit User: Audit_ User
- Database: IS_Repo User: IS_User
-
Database: DS_Repo (for example, the local repository) User: DS_User
NOTE: Make sure to document the password for each of the users created as it will be added when creating the data source below.
- Open ports 6400 and 8080 on the Firewall.
Create System DSN accounts for IPS_CMS and IPS_Audit data sources
- Select Start > Administrative tools > Data Sources (ODBC).
- Select System DSN tab.
- Accept all defaults.
- Enter IPS_CMS or IPS_Audit, depending on the data source being added, in the Name field.
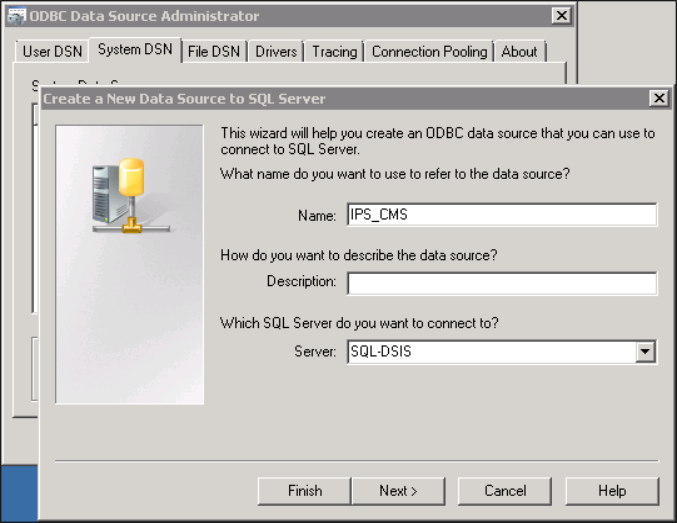
- Select SQL-DSIS from the Which SQL Server do you want to connect to? list box.
- Click Next.
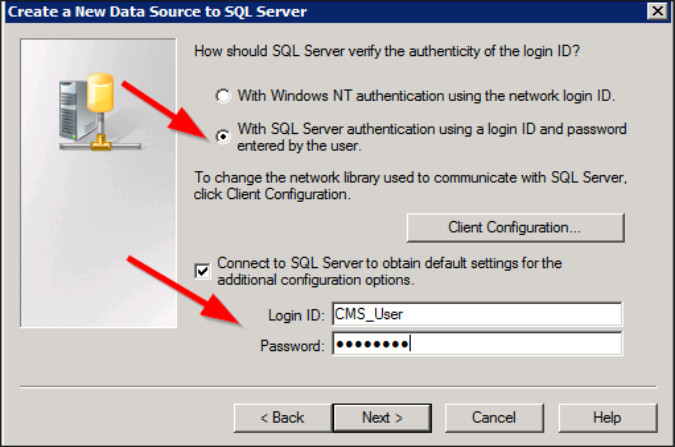
NOTE: Do not use Windows authentication—use CMS_User or Audit_User.
- Click the option With SQL Server authentication using a login ID and password entered by the user.
- Click Next.
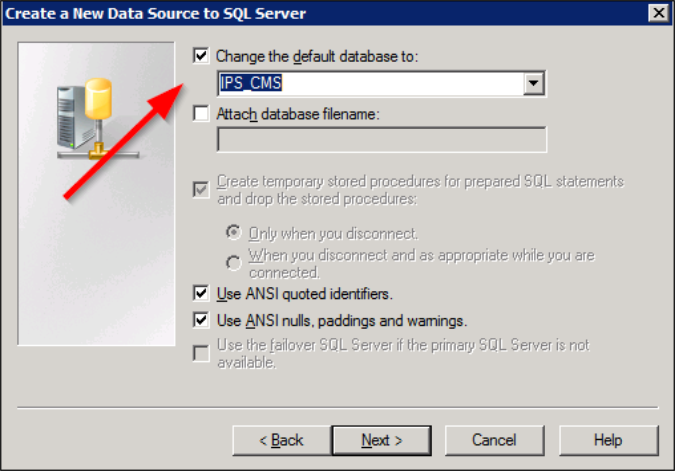
- Click the Change the default database to: check box and enter IPS_CMS or IPS_Audit as appropriate.
- Click Next.
- Accept all defaults and click Finish.
Install Information Platform Services
-
Run InstallIPS.exe as Administrator.
NOTE: This application can be downloaded at http://support.sap.com > Download Software.
- Select Install Type as Full.
- Check Configure an existing Database.
- Check Microsoft SQL Server Using ODBC twice.
- Install the default Tomcat Java Web Application Server and automatically deploy web applications.
- Check Do Not configure a version control system at this time.
- SIA Port 6410
- CMS port 6400
- CMS Administrator password: XXXX (use password SQL password created above)
- CMS Cluster Key password: XXXX (use password SQL password created above)
- Tomcat Ports - Connection Port: 8080 / Shutdown: 8005
- Do not configure connectivity to SMD agent
- Do not configure connectivity to Introscope Enterprise Manager
- Post install – Skip
- Run Central Configuration Manager to see if the Services for DS/IS are running
Install Data Services 4.2 SP8
-
Run Setup.exe as Administrator.
NOTE: This application can be downloaded at http://support.sap.com > Download Software.
- License: - use temp / perm license.
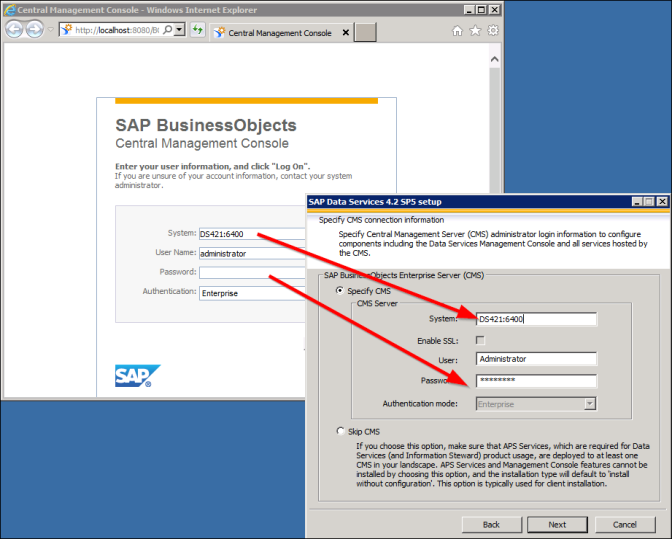
- System: XXXXX:6400 / IP:6400 (xxxxx is server name, or localhost).
- CMS: password (from IPS install above).
- Install with default configuration.
- Select Features – accept as is.
- Database type: MS SQL Server.
- Create local repository for Data Services.
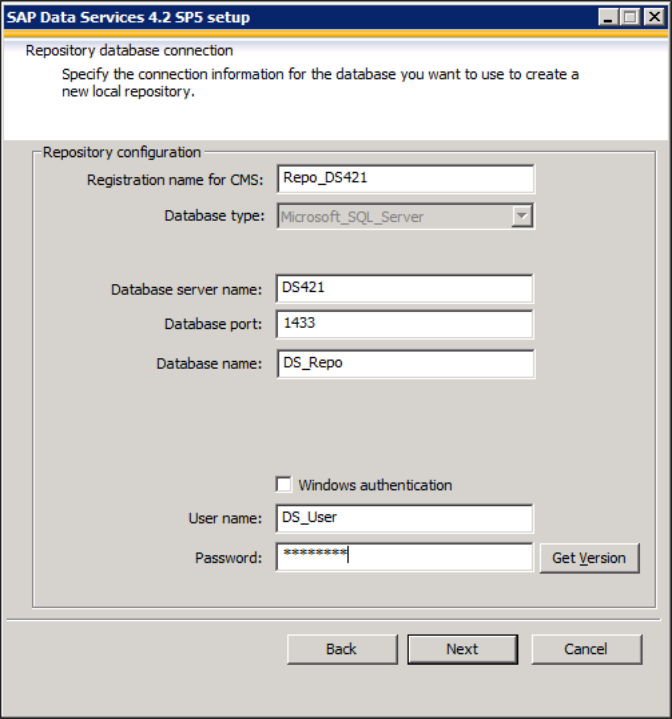
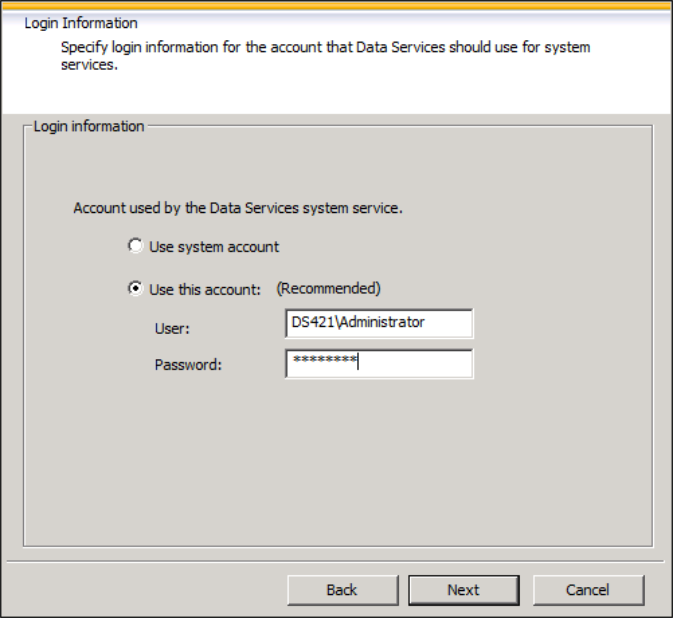
- Enter the Login Information for the server where DS is installed.
NOTE: The following steps install Data Services. Once the installation is complete, the computer must be restarted.
-
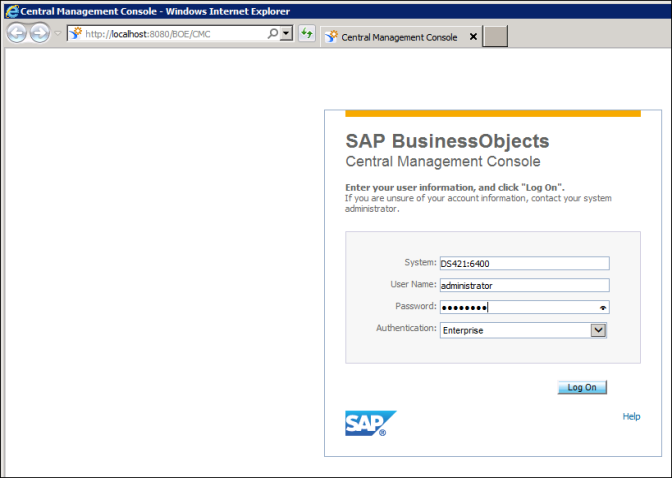
Open IPS Central Management Console (CMC).
- Check that Data Services is in drop down / and under Organize.
- On Central Management Console, select Applications from the drop down.
- Right-click Central Management Console, and select Program Object Rights.
- Set the program object rights as show below:
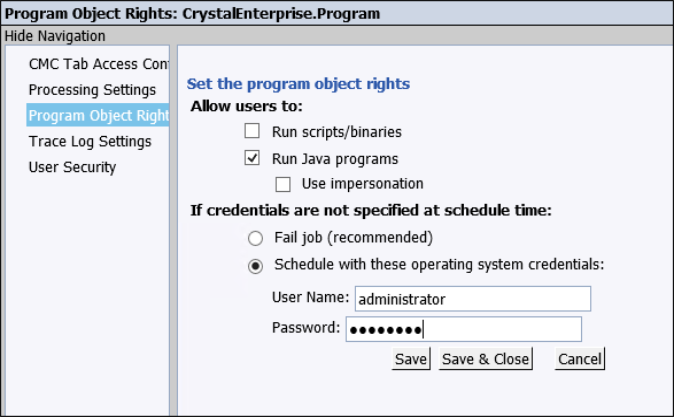
- Click Save & Close.
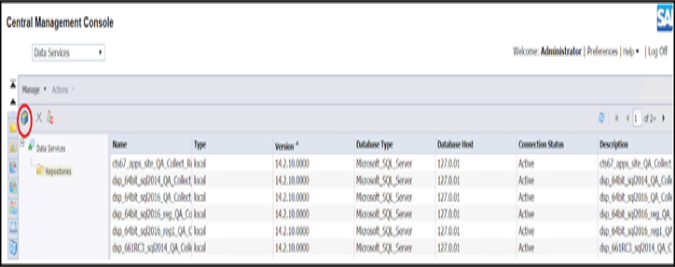
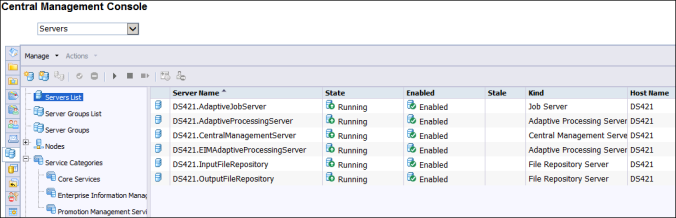
- On Central Management Console, select Servers from the drop down. Verify that all Servers are Enabled and Running
- On Central Management Console, select Data Services from the drop down. Verify that the Default Repository is displayed under Repositories.
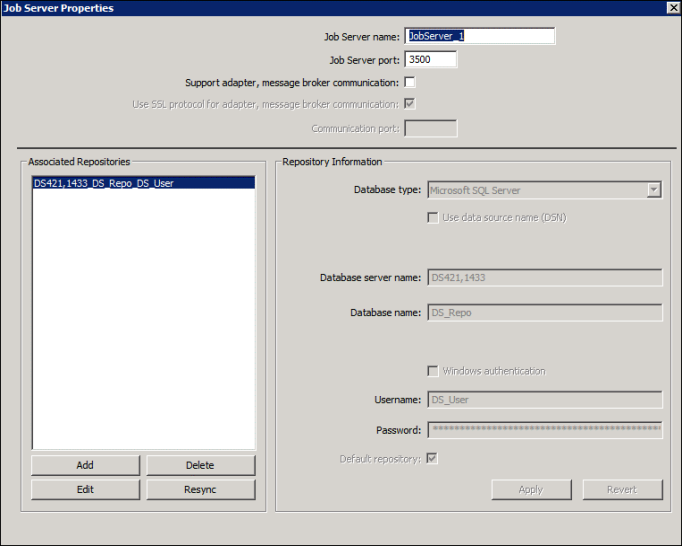
- Go to Start >All Programs >SAP Data Services 4.2 > Data Services Server Manager.
- Click Configuration Editor.
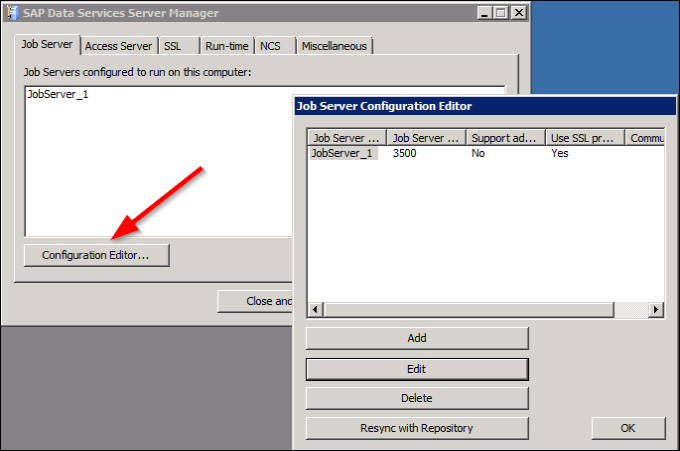
- Click Edit and verify the DS repository is defined correctly.
Install Information Steward (IS)
- Navigate to C:\...\SBOP_INFO_STEWARD_4.2_SP1_W_L_64B_\DATA_UNITS\IS_42_WIN.
- Run SSTXXXPackage.exe as Administrator.
- License: - Use a temp / perm license.
- Select install type: Primary.
- Select Localhost if repository is local.
- Leave default features checked.
- Database type :<Select MS SQL Server ver.xx>.
- On Repository Connection Information screen, enter Machine Name: [SQL Server Instance name], Port Number: 1433 (change this value if using Instance Names on the SQL server), Database Name: IS_Repo UserName: IS_User and enter Password.
-
Select the Create Repository option.
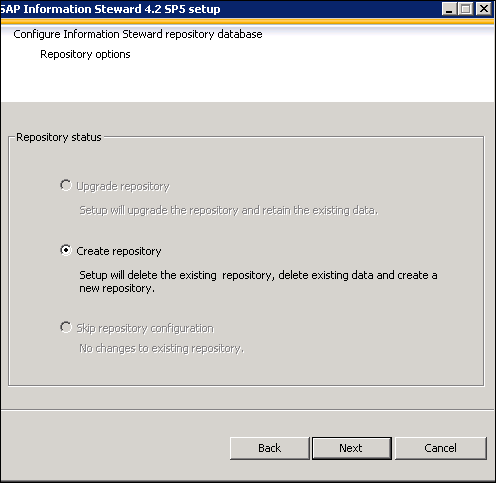
- Click Next.
-
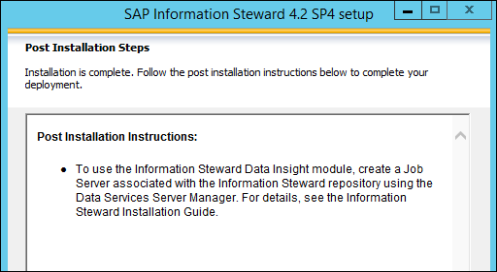
When the installation is complete, the following message is displayed.
-
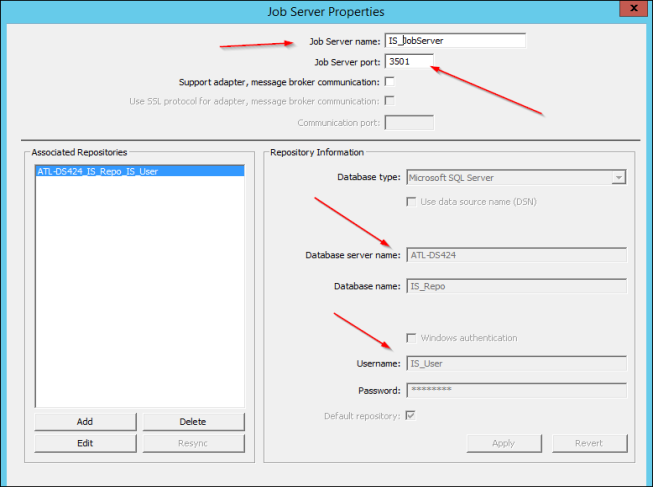
Go to SAP Data Services Server Manager and Add a Job Server. Complete the fields in the Job Server Properties window as shown in the following screen shot.
A database for the repository was created as part of the post-installation steps. If needed, refer to Create a Database for the Repository for information.